I am sick and feeling pretty lazy. So this will be short. Remember in the last post I said that we want to expose to the right of the 0 on our meters?Well, you can go too far - meaning that you could start to blow out essential parts of your picture. What this means is that thee could be so much light hitting certain parts of your picture that you are losing all detail. You don't want that, in general. Although sometimes you won't mind a little clipping (another way to name it) if you are still getting the good exposure on the most important part of your picture.
To see your histogram you will first take a picture. Then in the playback mode hit your display key. You might have to do this a few times to display the histogram. It will look something like this:
You will also see a small version of your picture. If there are areas that are being blown out they will blink.
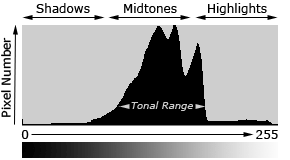
So when you are exposing to the right the mountain looking thing will move more to the right. You want it to go to the right as much as possible with out it hitting or "climbing" up the wall.
Here is a link to some videos on youtube explaining the histogram. They are really informational but annoying because of some lame background music. But if you can stand to watch them, they will really help you understand the histogram. As always let me know if you have any questions.
No comments:
Post a Comment