I know I have been neglecting this blog. I have been reading a lot and practicing a lot. But I haven't felt like writing about it. But here is a little info on light and a link to a really good article on light by Annie Manning from Paint the Moon. Seriously, read it and then reread it.
Light is one of the most important aspects of photography. You need good light to get a good picture. here are some quick things I can tell you and then head over to Annie's article here.
1. Full mid day sun is a pain to shoot in. It cast harsh shadows on people and just doesn't look that nice.
2. If you are shooting in mid day try to find some shade to stick your subject in but face them towards the light. This is called open shade.
3. If you are shooting mid day and there is no shade, try to position your subject with the sun behind them. then meter for the face. The background might get blown but the face is really your priority.
4. The best time to shoot outdoors is the "golden hour," which is the hour before sunset. The light is pretty and soft. You still might need open shade and might want to do some back lighting.
5. Shooting inside your house can be hard with natural light. Open up all your windows and stick your subject in front of them. You can even open up your door and stick your subject there.
6. Experiment with how you have your subject face the light. Facing the light straight on could give you flat lighting (not many shadows on the face). I actually don't hate flat lighting but a lot of photographers do. I say just experiment to see what you like. I will do a post where I show the difference with angles to the light source.
Okay so know go read Annie's article. Oh and you can look at these recent pics I did of my daughters.
ISO 100, shutter speed 1/125, f-stop 3.5
** I have had this pic critiqued in a couple different groups and no one has really liked it. But I LOVE it. I think my girls look so sweet and I just remember how awful of a photo shoot this was. What a horrible time they were having but they still tried to humor me.
ISO 100, Shutter Speed 1/160, f stop 3.5
** So I think I should have opened up my aperture a bit ( lower the number). That would have blurred my background more and then I could have upped my shutter speed which I think I should have at least at 1/250 with kids.
ISO 100, shutter speed 1/250, f-stop 3.5
Specializing in Families, Lifestyle, and Birth
Showing posts with label exposure. Show all posts
Thursday, April 26, 2012
Friday, March 16, 2012
Thursday, March 15, 2012
Using your Histogram to get good exposure
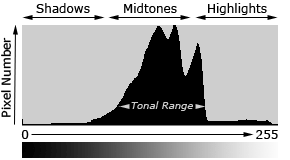
I am sick and feeling pretty lazy. So this will be short. Remember in the last post I said that we want to expose to the right of the 0 on our meters?Well, you can go too far - meaning that you could start to blow out essential parts of your picture. What this means is that thee could be so much light hitting certain parts of your picture that you are losing all detail. You don't want that, in general. Although sometimes you won't mind a little clipping (another way to name it) if you are still getting the good exposure on the most important part of your picture.
To see your histogram you will first take a picture. Then in the playback mode hit your display key. You might have to do this a few times to display the histogram. It will look something like this:
You will also see a small version of your picture. If there are areas that are being blown out they will blink.
So when you are exposing to the right the mountain looking thing will move more to the right. You want it to go to the right as much as possible with out it hitting or "climbing" up the wall.
Here is a link to some videos on youtube explaining the histogram. They are really informational but annoying because of some lame background music. But if you can stand to watch them, they will really help you understand the histogram. As always let me know if you have any questions.
To see your histogram you will first take a picture. Then in the playback mode hit your display key. You might have to do this a few times to display the histogram. It will look something like this:
You will also see a small version of your picture. If there are areas that are being blown out they will blink.
So when you are exposing to the right the mountain looking thing will move more to the right. You want it to go to the right as much as possible with out it hitting or "climbing" up the wall.
Here is a link to some videos on youtube explaining the histogram. They are really informational but annoying because of some lame background music. But if you can stand to watch them, they will really help you understand the histogram. As always let me know if you have any questions.
Friday, March 9, 2012
Metering Part Two
So here is a little example so you can see what I am talking about. I took these pictures today in my front room. The only light is the light coming in from my north facing window.
This first shot I chose my settings so my light meter arrow was pointing at the 0.
The settings are:
ISO 100
Shutter Speed 1/100s
f stop 1.8
See how the dogs fur looks grey. It shouldn't. This is a white dog.
So I changed my settings so that the light meter's arrow was pointing between the +1 and +2.
The new settings are:
ISO 200
Shutter Speed 1/60s
F stop 1.8
Both of these shots are strait out of camera (SOOC). They were just resized and sharpened for the web.
So there is actually a term for what we are doing here, ETTR (Exposing To The Right). It is possible to expose too much to the right and that is where using your histogram comes in. And that will be my next post. So stay tuned!
This first shot I chose my settings so my light meter arrow was pointing at the 0.
The settings are:
ISO 100
Shutter Speed 1/100s
f stop 1.8
See how the dogs fur looks grey. It shouldn't. This is a white dog.
So I changed my settings so that the light meter's arrow was pointing between the +1 and +2.
The new settings are:
ISO 200
Shutter Speed 1/60s
F stop 1.8
Both of these shots are strait out of camera (SOOC). They were just resized and sharpened for the web.
So there is actually a term for what we are doing here, ETTR (Exposing To The Right). It is possible to expose too much to the right and that is where using your histogram comes in. And that will be my next post. So stay tuned!
Thursday, March 8, 2012
How to Meter - Part One
Okay, this is going to be a quickly thrown together post but here goes. Get out your manual again. Grrrrr. I know. Just trust me. Look to see how to change the metering. I have a canon rebel xti and it is on the back next to the set button. It is just left of the ISO button.
Anyhow, on mine I have the choice between evaluative, partial, or center weighted metering. I have mine set on partial. Here is why:
I want the camera to give me an exposure reading of what ever the focus of my picture is. Usually, someone's face. If I have my metering set at evaluative it will take in the whole picture and that could result in the subject being under or overexposed.
Partial metering means that the camera will just take the exposure reading from the center part of my frame. So say I want to take a pic of my kid. I will scoot closer to her and get her face to fill up the frame of my camera. Then I will press the shutter button half way and check my meter. After I get my reading I will scoot back and take the picture based on the reading I got before. I won't worry about the meter any more after that.
Okay - next thing about metering. You might have noticed since you have been shooting manual that a lot of your pictures are underexposed. That is because your camera is trying to expose things to look 18% gray. Click here for a little explanation of that. Well, most peoples' skin isn't 18% grey so you will usually need to increase the amount of light you let in. That means that your meter would tell you you were overexposing - the needle will point to the 1 or more. But trust me, that will make your skin look better in your pictures.
So to wrap this one up. Do 2 things this next week.
1. Switch you metering to partial or spot, if you have it on your camera. Then fill your frame or the center part, anyway, with your subject when you are metering.
2. Expose a little to the right of the 0. To let in more light, you will have to either reduce shutter speed, increase aperture (go to a lower number), or increase ISO.
Please let me know if you have any questions about this. Happy Shooting!
Anyhow, on mine I have the choice between evaluative, partial, or center weighted metering. I have mine set on partial. Here is why:
I want the camera to give me an exposure reading of what ever the focus of my picture is. Usually, someone's face. If I have my metering set at evaluative it will take in the whole picture and that could result in the subject being under or overexposed.
Partial metering means that the camera will just take the exposure reading from the center part of my frame. So say I want to take a pic of my kid. I will scoot closer to her and get her face to fill up the frame of my camera. Then I will press the shutter button half way and check my meter. After I get my reading I will scoot back and take the picture based on the reading I got before. I won't worry about the meter any more after that.
Okay - next thing about metering. You might have noticed since you have been shooting manual that a lot of your pictures are underexposed. That is because your camera is trying to expose things to look 18% gray. Click here for a little explanation of that. Well, most peoples' skin isn't 18% grey so you will usually need to increase the amount of light you let in. That means that your meter would tell you you were overexposing - the needle will point to the 1 or more. But trust me, that will make your skin look better in your pictures.
So to wrap this one up. Do 2 things this next week.
1. Switch you metering to partial or spot, if you have it on your camera. Then fill your frame or the center part, anyway, with your subject when you are metering.
2. Expose a little to the right of the 0. To let in more light, you will have to either reduce shutter speed, increase aperture (go to a lower number), or increase ISO.
Please let me know if you have any questions about this. Happy Shooting!
Subscribe to:
Posts (Atom)